Pages

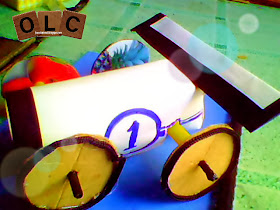
How To Make Recycled Toy Race Car

Recycling is good and something that we must encouraged to our kids. Today we are sharing you how to make a Toy Car out of different used materials. Instead of throwing them, why not making them more useful right?

To Start our project , we need the following


  • Disposable Caps
  • Huge Straw (2 pcs)
  • Cardboard (used)
  • White Bond Paper 
  • A pair of barbecue stick
  • Laces
  • Glue gun and glue sticks
  • Masking tape
Outline four Circles on the cardboard using the disposable cap
Cut them and set them aside first.

.
Create a hole at the side of the disposable cap making it possible for our straw to pass through from one side to another

Do the same thing to the other cap

Connect the mouth of the two caps using a masking tape

Cover it with a white card board and serve it as your car's chasis

Make your own design for your race car and after doing so, set it aside first.

Get the cardboard circles you cut awhile ago. And now using a stick, create a hole at the center of each circled card board
Do the same thing with other circles. Using the glue gun, put the lace around the circle.

 Do the same thing with other three and this will serve as our wheels.
Connect the wheels using a barbeque sticks and lock them the tape. Just put the stick inside the straw and connect the wheels on both sides.

Tadah! You got a Toy Race Car
Enjoy!!!


How to Do the Magic Coin Trick?

Today, we're sharing you how to do a simple coin magic trick that your kids will surely enjoy playing with. How can we make the coin vanish quickly? Here's how the trick is done. Look and observe carefully....

See this Coin and a Glass? I will make the coin disappear....
I'm going to cover the glass and the coin with a cloth... and cast the spell... "Abra... kadabra!"
Holah! the coin disappeared!!!

Now... let us put the coin back... cover the glass with the cloth and cast the spell "Abra Kadabra"
Tadah! The coin is back...

Now, how do you think this magic works? The secret is actually behind the glass and the cover. Let us revealed it to you. 
Click Here for the Spoiler. 

How To Make a Scratch-Off Card

Today, we'll be sharing you how to make your very own Scratch Off Cards. It is actually an ideal personalized gift that you can teach to your kids. They can apply such method along with their greeting cards (Valentines, Christmas, etc). It is inexpensive,creative and resourceful. Below are the images showcasing the step by step procedure. Have fun!
To start this project, here are the things that we need to prepare :

  • Cardboard (old or new)
  • Felt Tipped Pens or Markers
  • White Candle or Candle Wax
  • Poster Paint
  • Paint Brush
  • White Glue
  • Cut off a cardboard based on your desired size. Make sure you pick a clean and white cardboard with no visible designs or prints
  • Draw your design on the card. We decided to draw a "Raffle-ticket" like design but you can use any designs you want or better yet grab some available template online. I drew three hearts (one in each circle). Outline your design with black or colored marker.

  • Use the end of the candle like a crayon and fill in all the circles. This will stop the paint from sticking to the card so you can scratch it off later.
  • Scratch off cards are usually gray, but you can use other colors. Here, i used red! The trick is to mix the poster paint with an equal amount of white glue. this will make it stick to the candle wax.
  • Paint each circles with the mixture of paint and glue.
  • Let the paint dry and your scratch off card is done!
  • You can also create other shapes with different theme. Here's a sample of a Scratch Off card for Mother's Day.
***********************
If You like our Crafts, Feel free to follow us at our Facebook Page 
***********************